Overview
Datum is BIMIO's georeferencing auditor. It reads the project base point, the survey point and the internal origin of the host model and of every loaded Revit link, compares their positions and transforms against a reference model (the alpha model) and presents each problem as an actionable card: what is wrong, which model to act on, which native Revit tool to use and why it matters.
The tool is read-only: it does not fix anything for you and never touches the coordinate settings. Its philosophy is to detect and explain, leaving the correction in your hands with Revit's standard tools (Acquire Coordinates, Specify Coordinates at Point, Pin, and so on). This keeps the coordination workflow documented and under control.
Beyond the list of findings, Datum delivers three artefacts designed for a BIM manager's day-to-day work: a table with the measured coordinate state of every model (the numbers, not just the problems), a coordination matrix with passes and fails per model, and a world map over OpenStreetMap where each model is drawn with its three reference points, so you can see at a glance whether the federation is coordinated.
Who it's for
BIM managers and coordinators responsible for the shared coordinates and georeferencing setup of a federated project; also architects preparing a model for linking or export (IFC, NWC, GIS) who want to verify that the base points are where they should be.
Requirements
- Revit 2022 to 2026 with the BIMIO suite installed (Datum loads from the BIMIO tab and has no manifest of its own).
- An open project document (if no document is open, the button shows the warning 'Open a project first'; the audit is designed for project models, not for the Family Editor).
- To audit the links they must be loaded: an unloaded link is reported as not assessed (rule D000).
- For the world map: Microsoft Edge WebView2 Runtime installed and an internet connection (the map uses Leaflet and OpenStreetMap tiles downloaded from the network).
Where to find it
Clicking the button opens the 'BIMIO · Datum — coordinates & georeferencing' window. If it was already open, it is brought to the front instead of being duplicated.
As soon as it opens, Datum reads the model and evaluates every rule automatically: you do not need to click anything to see the first audit.
Key concepts 10 terms
- Project base point (PBP)
- The reference point of the project coordinate system in Revit. Datum measures its distance to the internal origin and to the nearest grid intersection, and shows its position in millimetres in the coordinates table.
- Survey point
- The point that anchors the model to the site's shared coordinate system (real surveying coordinates). It is the point the world map uses to place the project in the world.
- Internal origin
- The fixed (0,0,0) point of the Revit model, immovable. It is what 'internal origin' exports (IFC, NWC) and origin-to-origin links use. Several Datum rules check that the geometry and the PBP do not drift dangerously far from it.
- Shared coordinates
- Revit's mechanism for several models to share the same real-world position. Datum detects whether each model has them defined (the SHARED column in the table) and whether they match those of the alpha model.
- Alpha model
- The reference model everything else is audited against. By default it is the host, but you can designate any link (for example, the georeferenced civil model that 'rules' the project). The verdict, the matrix and several rules are computed against the chosen alpha.
- Geographic coordinate system (CRS / EPSG)
- The real map projection the model is georeferenced to (for example EPSG 25830, UTM 30N ETRS89 in Spain). Revit stores it as a system identifier; Datum shows it in the GEO SYSTEM column, checks that all models use the same one and uses it to geolocate the map.
- Coordination matrix
- A pass/fail table per model with three checks: it shares the alpha's coordinate system, its true north matches, and it is georeferenced to the real world. It also shows the passes, so 'checked and correct' is distinguishable from 'not checked'.
- Finding (diagnostic card)
- Each detected problem is presented as a card with a stable rule code (D000 to D026), a title, the severity and four fields: WHAT (what was measured), WHERE (which model to act on), TOOL (which native Revit tool to use to fix it) and WHY (why it matters).
- Severity
- Each finding is Error (red, breaks coordination: for example two models in different CRSs, geometry more than 32 km from the origin), Warning (orange, a real risk: unpinned link, mismatched units, PBP off grid) or Info (blue, a notice or context: unloaded link, ungeoreferenced model at an early stage).
- Thresholds (tolerances)
- The numeric limits that decide when each rule fires (mm of PBP-to-origin tolerance, degrees of rotation, warning and error distance to the internal origin...). They have sensible defaults and can be adjusted per office through a text file, to align Datum with the tolerances agreed in the BEP.
The interface
The main window is a single vertically scrolling panel. At the top, the header with the 'BIMIO · Datum' title, the one-line coordination verdict (green when clean, orange when there are problems) and a status line with the summary of the last read. Below it, a toolbar with the alpha model dropdown, the action buttons (Re-read, Map, HTML, CSV, Copy, Log) and the severity filter pills with their counts.
The body shows three blocks: the 'Coordinates' table with the measured state of each model, the 'Coordination matrix' with passes and fails against the alpha, and the finding cards grouped by model (host first), each group with its worst-severity label. The world map opens in a separate window.
Step-by-step workflows 10 workflows
1Run the first audit of the project
6 steps
Goal. Get a complete coordinate and georeferencing diagnosis of the host and all links in seconds.
- Open the project you want to audit in Revit and check in Manage > Manage Links that the relevant links are loaded.An unloaded link cannot be assessed: Datum will list it under rule D000 (not assessed).
- Go to the BIMIO tab, Setup panel, and click the Datum button.The Datum window opens and the read starts on its own: no button needs clicking for the first audit.
 assets/shots/datum/fig-03.pngRevit ribbon with the BIMIO tab open and the Datum button highlighted in the Setup panel.
 - Read the verdict under the title.In green: 'Coordinated against <alpha>: no coordinate or georeferencing issues'. In orange: the count of errors, warnings and info items, plus how many links share the alpha's coordinate system.
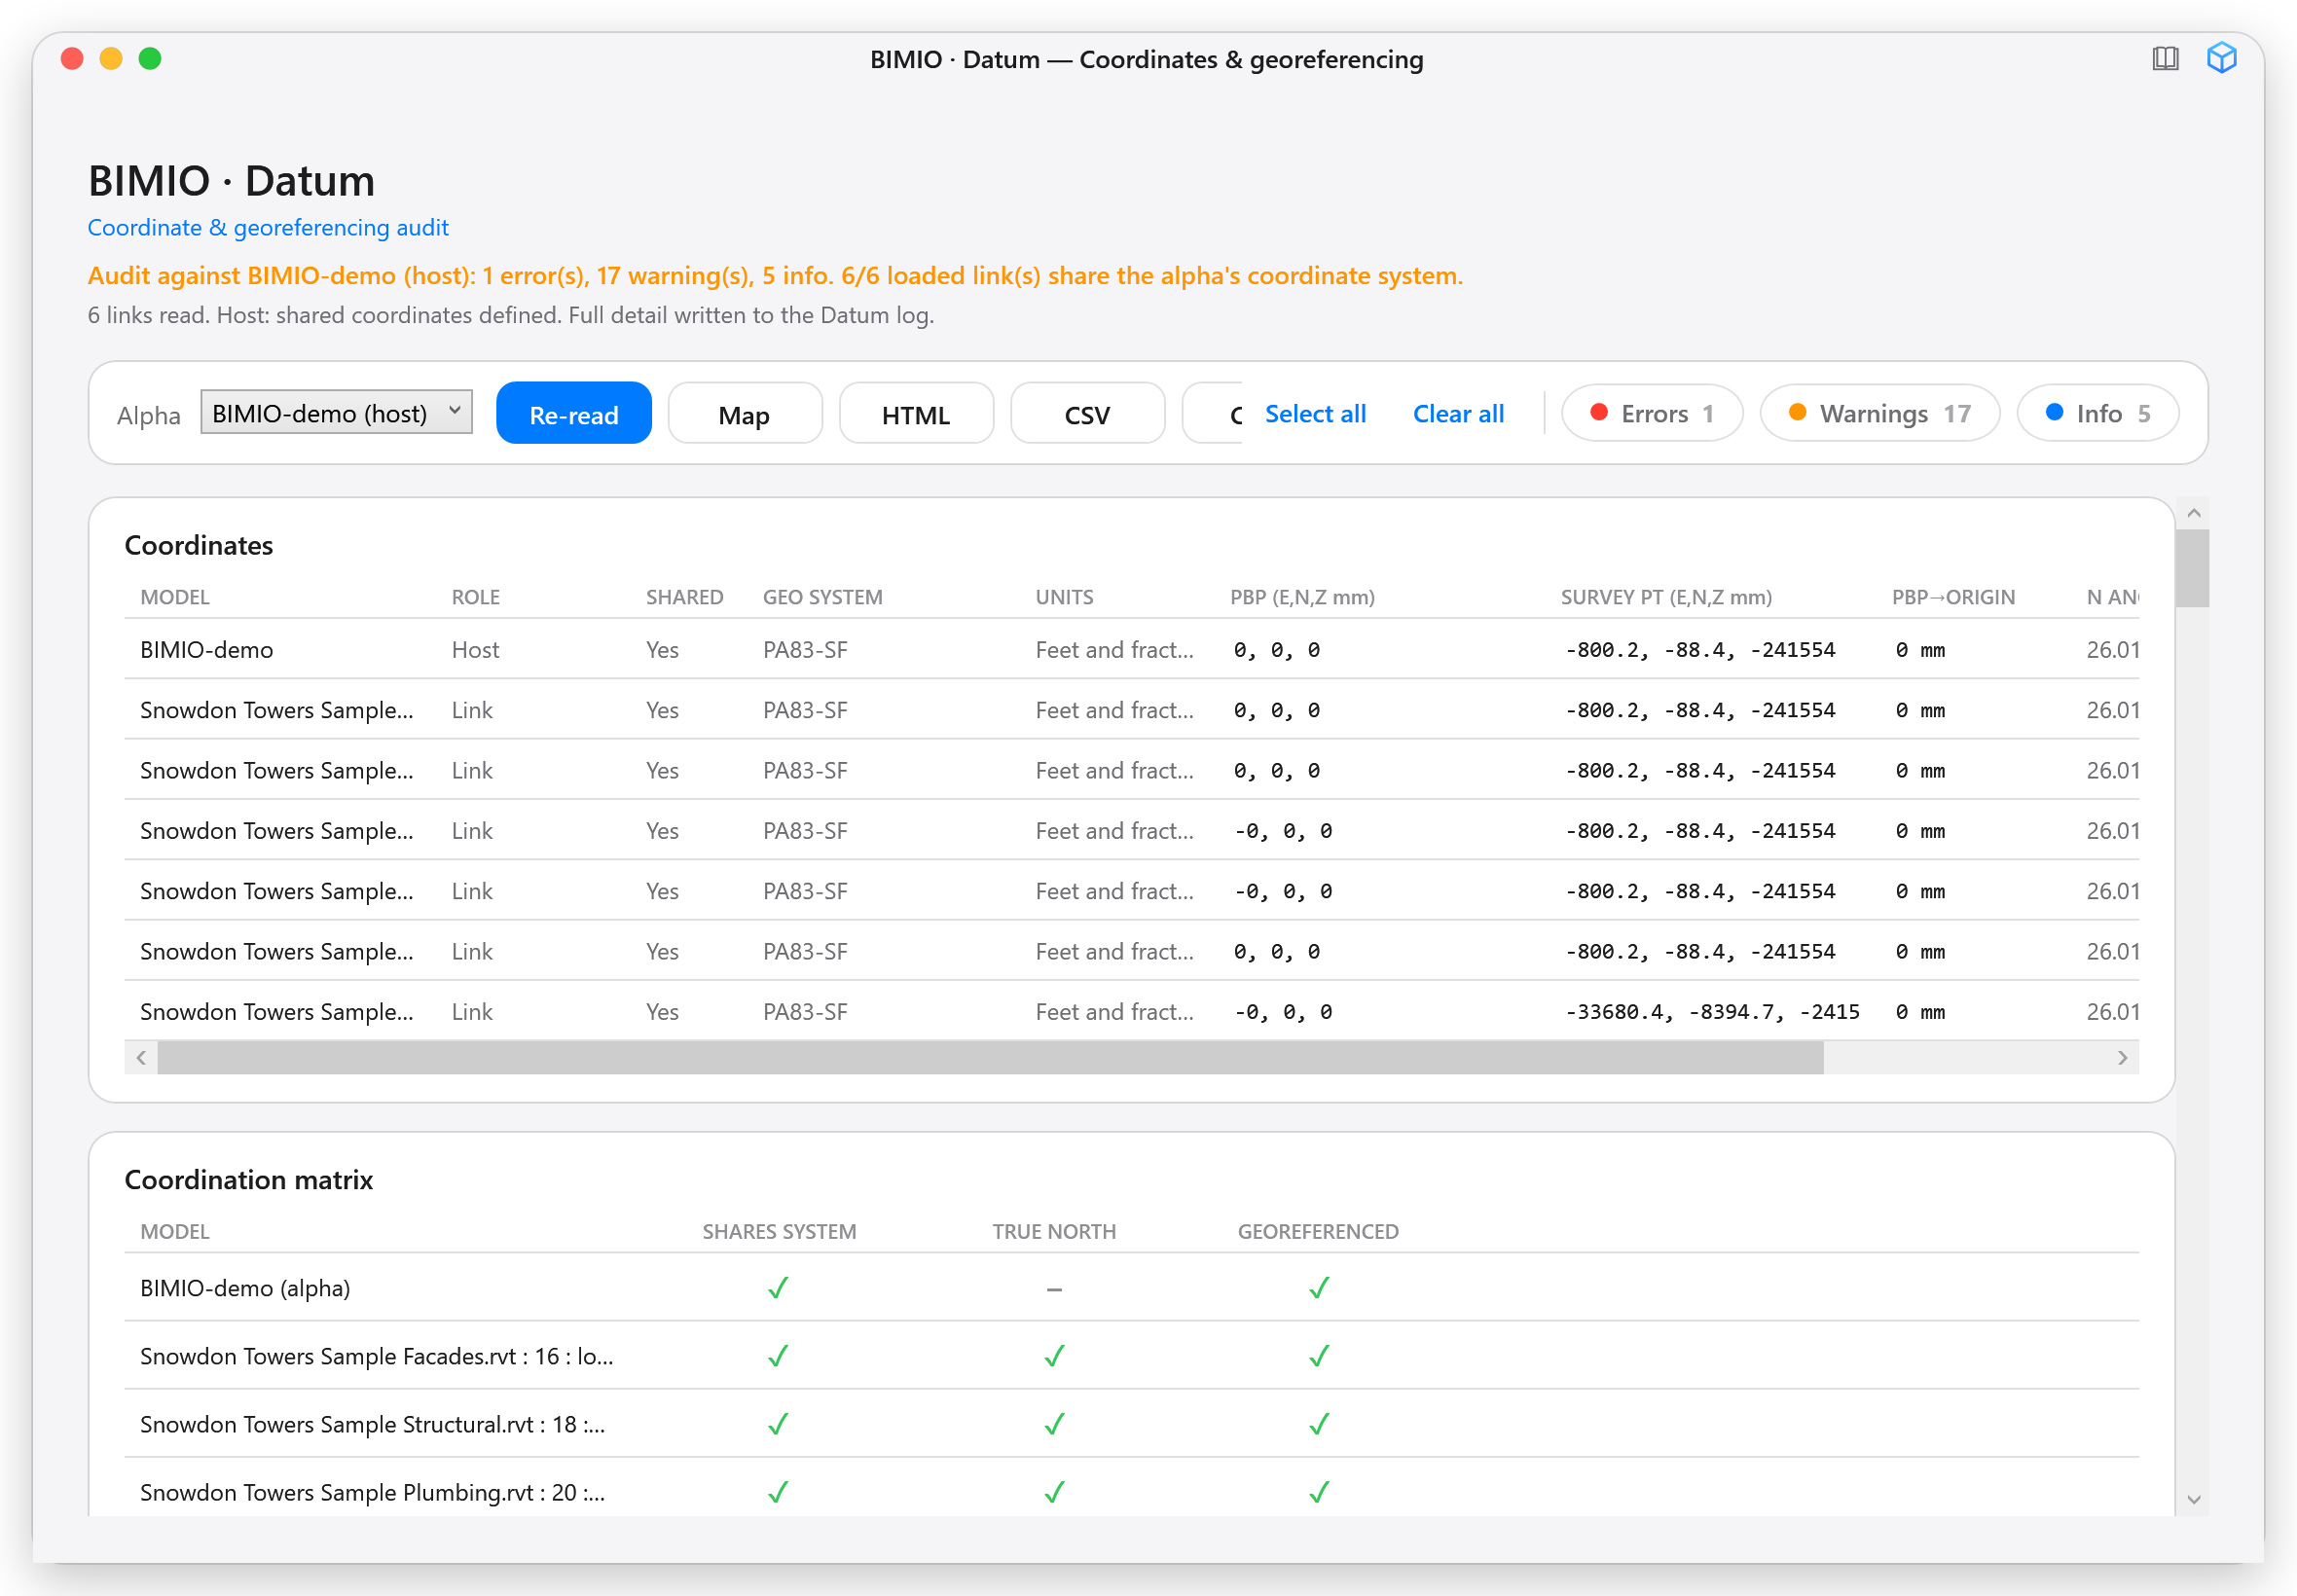
- Review the Coordinates table to see each model's measured numbers: shared coordinates yes/no, geographic system, units, PBP and survey point positions, distance to the origin and whether the link is pinned.This table is the real state of the project, whether problems were detected or not; it is what you quote in coordination minutes.
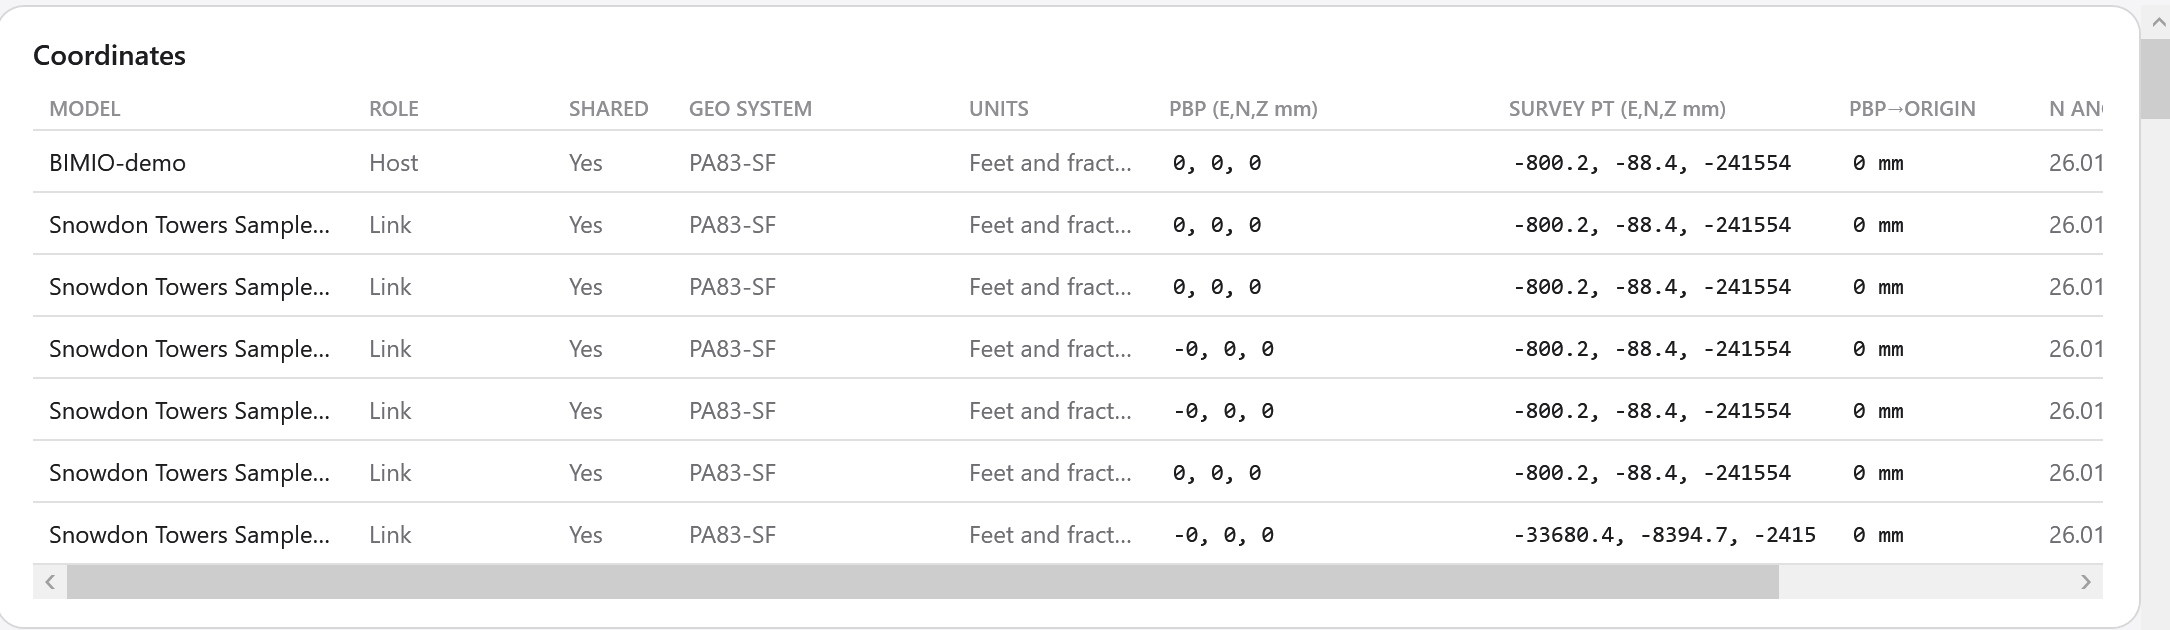 assets/shots/datum/fig-04.pngDetail of the Coordinates table with one row per model and the PBP, SURVEY PT and GEO SYSTEM columns visible.
 - Review the Coordination matrix: each model with its pass or fail on SHARES SYSTEM, TRUE NORTH and GEOREFERENCED.
- Work through the finding cards, grouped by model with the host first. On each card, WHAT tells you what was measured, WHERE which model to act on, TOOL the native Revit tool to fix it with and WHY why it matters.The card text can be selected and copied directly for pasting into an email or minutes.
 assets/shots/datum/fig-05.pngA D016 finding card (mismatched geographic systems) with its red error band and the WHAT/WHERE/TOOL/WHY fields.
- The full read of each audit is also dumped to the log file, in case you need the raw data.
- Info findings (blue) do not always require action: for example, 'no shared coordinates' is normal in an early-stage model.
2Choose the alpha model and re-evaluate against it
3 steps
Goal. Audit the federation against the model that actually rules the project (for example, the georeferenced civil model).
- In the toolbar, open the Alpha dropdown. You will see the host (marked '✓ alpha' by default) and each link by name.
- Select the correct reference model.As the alpha, choose the model whose coordinate setup is the project's 'truth': usually the georeferenced survey or civil model, or the deliverable model.
- Watch the verdict, the coordination matrix and the findings recalculate instantly, without re-reading the model.The cross-model rules (system sharing, rotation, CRS, units, shared elevation) are now compared against the new alpha; the alpha itself is not compared against itself.
 assets/shots/datum/fig-06.pngAlpha dropdown open with a civil link selected and the verdict recalculated against it.
- If the chosen alpha is not georeferenced but a link is, Datum flags it and tells you to acquire coordinates from that link into the alpha.
3Filter the findings by severity
3 steps
Goal. Focus on the critical items first by temporarily hiding warnings and info items.
- Click the Errors, Warnings or Info pills in the toolbar to toggle each severity on or off. Each pill shows its count.
- Use Select all to show everything again, or Clear all to hide everything at once.
- If the filter hides every existing finding, Datum shows a notice telling you to re-enable one of the pills.The filter only affects the view: the HTML and CSV exports always include all findings.
- Start with only Errors enabled to resolve the coordination blockers, then bring Warnings and Info back in.
4Locate a finding in the model (Show where)
4 steps
Goal. Physically see in Revit the link or the exact point a card refers to.
- On a card that supports it, click the 'Show where' button.The button only appears when the finding has a locatable target: a selectable link or a specific coordinate.
- If the finding refers to a link (for example D017, unpinned link), Datum selects the link instance in Revit and reframes the open view (zoom to fit).
- If the finding refers to a point (PBP position, model centroid...), Datum draws a temporary blue axis cross of about 2 metres per arm at that coordinate, selects it and reframes the view so you can see it (zoom to fit).The marker is a temporary element created in a transaction named 'BIMIO Datum — marker'; it is not part of the final model.
 assets/shots/datum/fig-07.pngRevit 3D view with the temporary blue axis cross marking the position of the project base point.
 - Carry on working as normal: all temporary markers remove themselves when you click Re-read or close the Datum window.
- If a marker were ever orphaned (for example after an abrupt shutdown), just reopen Datum: the first automatic read (like every Re-read) cleans up all markers; the clean-up is idempotent.
5Fix a problem and verify with Re-read
4 steps
Goal. Close the loop: apply the recommended fix and check that the finding disappears.
- On the finding's card, read the TOOL field: it names the exact native Revit tool (for example Manage > Coordinates > Acquire Coordinates, or select the link and click Pin).Datum never changes the settings for you: the fix is always made with Revit's standard tools.
- Apply the fix in Revit.
- Go back to the Datum window and click Re-read.Datum removes the temporary markers, re-reads the host and all links, rebuilds the Alpha dropdown and re-evaluates every rule.
- Check that the card has disappeared and that the verdict and the matrix reflect the new state.
- If you change links (load, reload, move), always click Re-read: the window does not detect model changes on its own.
6View the federation on the world map
5 steps
Goal. Visually check over OpenStreetMap that every model lands where it should in the real world.
- Click Map in the toolbar. The 'BIMIO · Datum — World Map' window opens.
- Wait for Datum to geolocate the project automatically.If Revit exposes a recognised geographic system (British National Grid, Irish Grid, ITM, ETRS89/UTM, WGS84/UTM, Australian MGA or a direct EPSG identifier), Datum converts it to its EPSG and precisely projects the shared coordinates of all models. If not, it uses the site's latitude/longitude and local offsets in metres.
- Read the markers: the number identifies the model (1 = host, 2 onwards = links, per the legend) and the colour the point type: blue = survey point, green = project base point, red = internal origin.In a well-coordinated project, the equivalent points of every model cluster together; an uncoordinated model lands visibly far away.
 assets/shots/datum/fig-08.pngWorld map with numbered markers clustered over the project site and the model legend on the right.
 - Use the legend to show or hide models with their checkboxes, or the Show all / Clear all links. Overlapping markers group into a circle with a count that expands when clicked.
- Click any marker to see its name and its exact latitude/longitude coordinates in a popup.If the project has property lines drawn and the map was generated via EPSG, the plot appears as a blue polygon.
- The map's status bar always states the source of the geolocation, for example 'Auto-detected BritishNatGrid (EPSG 27700)' or 'Site location (local metres, no EPSG needed)'.
- The map reuses the read already done by the panel, so opening it is instant.
7Place the project with an EPSG code (fallback)
3 steps
Goal. Place the project on the map when Revit does not expose a usable geolocation.
- If the 'Fallback — Project EPSG:' bar appears when you open the map, it means the model has no real geographic location (empty site location or still at Revit's default location, Boston) or that its shared coordinates are projected but the system is not recognisable.In the second case, Datum places at least the survey point from the site location and asks for the EPSG for the rest, rather than drawing an incorrect map.
- Type the project's EPSG code into the text field.Examples: 25830 (Spain, UTM 30N ETRS89), 27700 (United Kingdom), 2157 (Ireland ITM), 326xx/327xx (UTM WGS84 north/south). The code is in the BEP or the project's surveyor knows it.
- Click 'Show on map'.Datum converts the shared coordinates of all models with that projection and also draws the property lines if they exist.
 assets/shots/datum/fig-09.pngMap window with the EPSG bar filled in with 25830 and the project placed on its plot.
- Datum never guesses the EPSG: a wrong guess would place the project in another country. If the code is invalid or unsupported, the status bar tells you and lists the supported code families.
8Export the HTML report
3 steps
Goal. Generate a browsable, self-contained report to share with the team or attach to minutes.
- Click HTML in the toolbar.
- The report is generated and opens automatically in your default browser.It includes the verdict, statistics, all findings with a search box and filters, the coordinates table, the coordination matrix and a metadata block (project, alpha, author, Revit and tool versions, applied tolerances). It has a light/dark toggle and works offline: it loads nothing from the internet.
 assets/shots/datum/fig-10.pngDatum's HTML report open in the browser, with the statistics cards at the top and the findings table with the search box.
 - Locate the file if you want to archive or send it: it is saved in Datum's reports folder inside your local profile (AppData Local, FJV, Datum, reports) with the name Datum-<project>-<date-time>.html.
- Because the report does not depend on any CDN or web font, it looks the same on locked-down corporate networks.
9Export CSV or copy the table to the clipboard
2 steps
Goal. Take the audit data into Excel or an issue log.
- Click CSV to generate a file with three blocks: metadata (project, alpha, date, author, versions, tolerances and verdict), the COORDINATES table and the FINDINGS table with all findings.The file is saved next to the HTML reports and opens automatically with the associated application (usually Excel). It is encoded as UTF-8 with BOM so Excel displays accented characters correctly.
- Or click Copy to copy just the coordinates table as tab-separated text.The status line confirms 'Coordinate table copied to the clipboard'. Paste it straight into an Excel sheet: each column lands in its own cell.
- The CSV always includes all findings, regardless of the severity filter active on screen.
10Check the log and tune the tolerances to the BEP
4 steps
Goal. See the raw detail of each read and align the rule thresholds with the tolerances agreed for your project or office.
- Click Log in the toolbar to open Datum's log folder in Explorer.Each audit dumps a full block with the coordinates read from each model; useful for diagnostics or for keeping evidence.
- To adjust the tolerances, create or edit the datum-thresholds.txt file in Datum's configuration folder inside your local profile (AppData Local, FJV, Datum), with key=value lines.Available keys: OriginTolMm (default 1), RotationTolDeg (0.01), GridSnapTolMm (50), QuadrantFarMm (5000), FarWarnMm (10000000), FarErrMm (32000000), VerticalDatumTolMm (10), TrueNorthTolDeg (0.5) and DuplicateTransTolMm (1000). Lines starting with # are comments; use a decimal point.
- Close and reopen the Datum window so the new thresholds are loaded.The thresholds are read when the panel opens; if the file does not exist or a line is invalid, the defaults are used without failing.
- Check in the exports that the metadata block states the main applied tolerances (PBP-origin, rotation, grid snap and warning/error distances to the origin), so the report says which criteria the audit used.
- Distribute the same datum-thresholds.txt to the whole team so everyone audits with identical criteria.
Options reference 11 options
| Option | What it does |
|---|---|
| Alpha (dropdown) | Choose the audit's reference model: the host (default, marked '✓ alpha') or any link. Changing it re-evaluates instantly without re-reading the model. |
| Errors / Warnings / Info (filter pills) | Per-severity visibility toggles, each with its count. They only affect the on-screen view, not the exports. |
| Select all / Clear all | Enable or disable the three severity pills at once. |
| Re-read | Reads the host model and every link again, removes the temporary markers and re-evaluates every rule. Use it after any change in Revit. |
| Map | Opens the world map window (a single instance; if it is already open it is brought to the front). |
| HTML / CSV / Copy | Export the browsable report or the spreadsheet CSV, or copy the coordinates table to the clipboard in tab-separated form. |
| Log | Opens Datum's log file folder in Windows Explorer. |
| 'Fallback — Project EPSG' field + Show on map (map window) | Only visible when automatic geolocation is impossible or incomplete: enter the project's EPSG code and click Show on map to project the shared coordinates precisely. |
| Map legend (per-model checkboxes, Show all / Clear all) | Shows or hides each model's markers on the map; point types are identified by colour (Survey blue, PBP green, internal origin red). |
| Search box and light/dark theme (HTML report) | Inside the exported report: global finding search, filters and a theme toggle, all self-contained and offline. |
| datum-thresholds.txt tolerances file | Per-user persisted configuration (FJV/Datum folder in the local profile) with nine key=value thresholds: PBP-to-origin tolerance (1 mm), rotation (0.01 degrees), grid intersection snap (50 mm), quadrant warning (5 m), warning/error distance to the internal origin (10 km / 32 km), vertical datum (10 mm), north declination considered 'established' (0.5 degrees) and separation between duplicate instances of a link (1 m). Loaded when the window opens; without the file, the defaults are used. |
What you get out
- Self-contained HTML report (no network dependencies) with the verdict, statistics, searchable findings, coordinates table, coordination matrix and metadata with the main applied tolerances; saved in Datum's reports folder in the local profile with the name Datum-<project>-<date-time>.html and opened in the browser.
- CSV report (UTF-8 with BOM, Excel-friendly) with a metadata block, the COORDINATES table and the FINDINGS table, in the same reports folder.
- Coordinates table on the clipboard as tab-separated text, ready to paste into Excel.
- datum-*.log log files with the full dump of each read, in Datum's logs folder (AppData Roaming, FJV/Datum/logs).
- Temporary axis-cross markers in the model (only while you use 'Show where'; removed automatically on re-read or when the window closes).